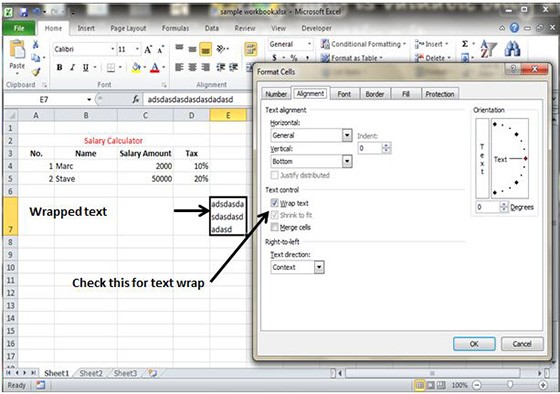
ក្តោប និង ពង្រួញអត្ថបទ (Wrap Text and Shrink to fit)
ប្រសិនបើ អត្ថបទធំពេក មិនល្មមនឹងទំហំ column ហើយចង់ជៀសវាង មិនឲ្យអត្ថបទហ៊ារទៅប្រអប់ cells ដែល នៅជាប់ យើងអាចប្រើ Wrap Text ឬ Shrink to fit ដើម្បីបញ្ចូលអត្ថបទ។

Borders and Shades:
Borders
Excel 2016 អនុញ្ញាតអោយអ្នកអាចដាក់ Border ទៅលើ Cell នីមួយៗបានផងដែរ ។ ដើម្បីធ្វើការដាក់ ស៊ុមព័ទ្ធជុំវិញ Cell យើងត្រូវអនុវត្តតាមជំហានដូចខាងក្រោម៖
ចុច Mouse ស្តាំ » ជ្រើសយក Format cells » ជ្រើសយក Border Tab » Select Border Style

បន្ទាប់មក អ្នកអាចដាក់ Border តាមវិធីមួយបែបទៀតគឺ ជ្រើសយក Home Tab » Font group » Apply Borders

Shades
អ្នកអាចធ្វើការដាក់នូវ Shading ទៅកាន់Cell នីមួយៗបានផងដែរតាមវីធីងាយដូចខាងក្រោម: ចូលទៅកាន់ Home Tab » Font Group » Select the color

Format Cells
នៅក្នុង Excel 2016 យើងអាចធ្វើការដាក់នូវFormat ទៅកាន់ Cell ឬ ជួរនៃ Cell (Range of cell) ដោយគ្រាន់តែធ្វើតាមជំហានដូចខាងក្រោម៖
ចុច Mouse ស្តាំ (Right Click) » Format cells » Select the tab បន្ទាប់មកយើងនឹងឃើញមាន tab ជាច្រើនដែលអាចជ្រើសរើសបានមានបង្ហាញដូចរូបខាងក្រោម៖

ជម្រើសផ្សេងទៀតដែលអ្នកអាចធ្វើការ ដាក់នូវ Background៖
- Number: ការកំណត់ Format of cell ដោយអាស្រ័យទៅនឹង cell content
- Alignment: ការកំណត់ alignment text
- Font: ការកំណត់ទៅលើប្រភេទនៃ Font Style
- Border: ការកំណត់លើ Borderរបស់ Cell នីមួយៗ
- Fill: កំណត់ទៅលើការចាក់ពណ៌ទៅលើ Cell នីមួយៗ
- Protection: ការកំណត់ cell protection


