We can create a web form that has ADO.NET connectivity. A simple web form that has form controls can be submitted to the server. ADO.NET allows us to store the submitted values to store into SQL Server database.
Here, we are creating a web form application that connects to the SQL Server database.
This web form contains the following source code.
WebForm
// WebFormAdoNet.aspx
- <%@ Page Language=”C#” AutoEventWireup=”true” CodeBehind=”WebFormAdoNet.aspx.cs”
- Inherits=”ado.netWebFormExample.WebFormAdoNet” %>
- <!DOCTYPE html>
- <html xmlns=”http://www.w3.org/1999/xhtml”>
- <head runat=”server”>
- <title></title>
- <style type=”text/css”>
- .auto-style1 {
- width: 100%;
- }
- .auto-style2 {
- width: 100px;
- }
- .auto-style3 {
- width: 95px;
- }
- </style>
- </head>
- <body>
- <form id=”form1″ runat=”server”>
- <div>
- <table class=”auto-style1″>
- <tr>
- <td class=”auto-style2″>
- <asp:Label runat=”server” Text=”User Name” ID=”usernamelabelId”></asp:Label></td>
- <td>
- <asp:TextBox ID=”UsernameId” runat=”server”></asp:TextBox></td>
- </tr>
- <tr>
- <td class=”auto-style2″>
- <asp:Label runat=”server” Text=”Email ID”></asp:Label></td>
- <td>
- <asp:TextBox ID=”EmailId” runat=”server”></asp:TextBox></td>
- </tr>
- <tr>
- <td class=”auto-style2″>
- <asp:Label runat=”server” Text=”Contact”></asp:Label></td>
- <td>
- <asp:TextBox ID=”ContactId” runat=”server”></asp:TextBox></td>
- </tr>
- <tr>
- <td class=”auto-style2″></td>
- <td>
- <asp:Button ID=”ButtonId” runat=”server” Text=”Submit” OnClick=”ButtonId_Click” /></td>
- </tr>
- </table>
- </div>
- <div>
- <asp:Label ID=”Label1″ runat=”server”></asp:Label>
- </div>
- </form>
- <table class=”auto-style1″>
- <tr>
- <td class=”auto-style3″>
- <asp:Label ID=”Label2″ runat=”server”></asp:Label></td>
- <td>
- <asp:Label ID=”Label5″ runat=”server”></asp:Label></td>
- </tr>
- <tr>
- <td class=”auto-style3″>
- <asp:Label ID=”Label3″ runat=”server”></asp:Label></td>
- <td>
- <asp:Label ID=”Label6″ runat=”server”></asp:Label></td>
- </tr>
- <tr>
- <td class=”auto-style3″>
- <asp:Label ID=”Label4″ runat=”server”></asp:Label></td>
- <td>
- <asp:Label ID=”Label7″ runat=”server”></asp:Label></td>
- </tr>
- </table>
- </body>
- </html>
CodeBehind
// WebFormAdoNet.aspx.cs
- using System;
- using System.Data.SqlClient;
- namespace ado.netWebFormExample
- {
- public partial class WebFormAdoNet : System.Web.UI.Page
- {
- protected void Page_Load(object sender, EventArgs e)
- {
- }
- protected void ButtonId_Click(object sender, EventArgs e)
- {
- SqlConnection con = null;
- try
- {
- // Creating Connection
- con = new SqlConnection(“data source=.; database=student; integrated security=SSPI”);
- // Writing insert query
- string query = “insert into student(name,email,contact)values(‘”+UsernameId.Text+ “‘,
- ‘” + EmailId.Text + “‘,'” + ContactId.Text + “‘)”;
- SqlCommand sc = new SqlCommand(query,con);
- // Opening connection
- con.Open();
- // Executing query
- int status = sc.ExecuteNonQuery();
- Label1.Text = “Your record has been saved with the following details!”;
- // ———————– Retrieving Data —————— //
- SqlCommand cm = new SqlCommand(“select top 1 * from student”, con);
- // Executing the SQL query
- SqlDataReader sdr = cm.ExecuteReader();
- sdr.Read();
- Label2.Text = “User Name”; Label5.Text = sdr[“name”].ToString();
- Label3.Text = “Email ID”; Label6.Text = sdr[“email”].ToString();
- Label4.Text = “Contact”; Label7.Text = sdr[“contact”].ToString();
- }
- catch (Exception ex)
- {
- Console.WriteLine(“OOPs, something went wrong.” + ex);
- }
- // Closing the connection
- finally
- {
- con.Close();
- }
- }
- }
- }
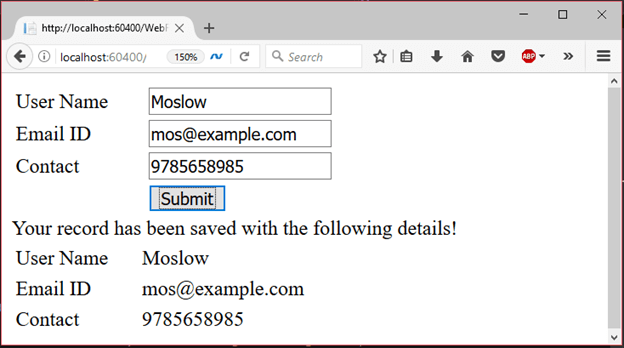
Output:
It produces the following output to the browser.

Fill the form and submit data.
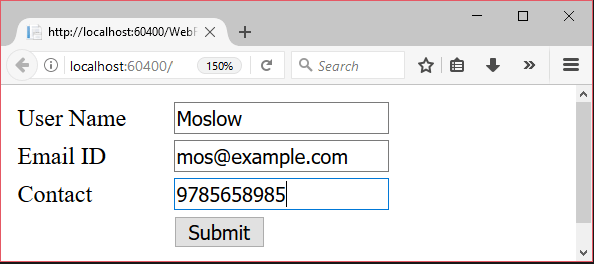
After submitting, it store and retrieve the data from the SQL Server database.
